Add Nedap AEOS access control platform to Alta Video
Last modified: Monday September 11, 2023.
By integrating Alta Video and your Nedap AEOS access control platform, you have all the tools and features to display your access control events in the Alta Video user interface alongside the video and map information from the cameras near each access control point. In addition, you can configure Alta Video so that your operators can remotely open doors from within the Alta Video user interface.
Nedap AEOS allows up to a maximum of five different sessions per AEOS user. When planning your Nedap and Alta Video integration, take into consideration that each Alta Video access control server you add to AEOS uses one of these five sessions.
Add your Nedap AEOS access control platform to your Alta Cloud Connector, using a similar method to how you add other cameras and devices.
Prerequisites
Your Avigilon Alta deployment must include an Alta Cloud Connector located either on the same network or a network that is routable from your Nedap AEOS system.
Ensure that the Nedap AEOS access control system has been configured, a dedicated user account has been created, and that you have the following information available:
- The AEOS Host name.
- The remote username and remote password needed to log into the dedicated user account on your Nedap AEOS access control system, specifically for Alta Video.
- The SOAP Port used by AEOS.
- The Socket Port used by AEOS.
Task — Add a Nedap AEOS access control system
Follow the steps to configure both AEOS and Alta Video.
Task — AEOS configuration
- In AEOS, go to
Administration – Maintenance – Settings – System properties . - Enable option; - 44.15 Soap WebService
(See the additional SOAP information at https://portal.nedapsecurity.com/system/files/2020-07/aeos_soap_webservice_icm_v33_en.pdf)Make a note of the SOAP ports, as you will need this information when configuring Alta Video.
- The Socket Interface is enabled by default over port 8035.
If you are not using the default port, then note the port in use.(See the additional socket interface information at https://portal.nedapsecurity.com/system/files/2021-04/aeos_socketinterface_icm_v22_en.pdf)
Make a note of the Socket port, as you will need this information when configuring Alta Video.
- Create a dedicated user for the Alta Video integration.
- Ensure the corresponding user role has the following user functions assigned:
- Configuration, Socketconnection, Commands
- Configuration, Socketconnection, Events
Task — Add a Nedap AEOS access control system
- From the toolbar, open
> Devices . - Click
Access Control . - Click the
button.
- Click the
Add new server button.
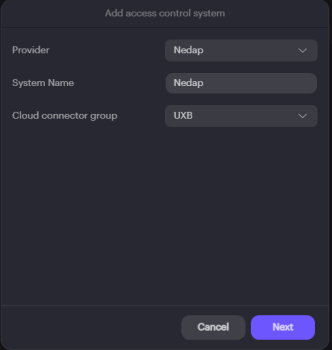
TheAdd access control systems dialog opens. - Configure the general Nedap and Cloud Connector information:
- Select
Nedap fromProvider . - Enter the name used to identify this access control integration in
System Name . - Select the relevant
Cloud connector group . - Click
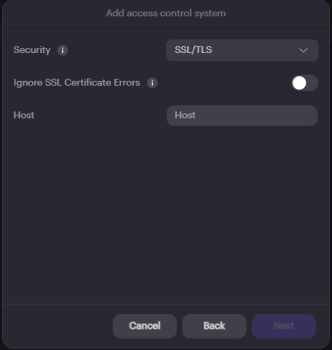
Next . - Configure the Nedap Security and Host IP settings:
- Select your required
Security option from the drop-down list.
The options are:SSL/TLS — TLS is used to encrypt the data.Insecure — Sends all messages unencrypted.We do not recommend using the
Insecure option.
- Choose to
Ignore SSL Certificate Errors if appropriate.If
Ignore SSL Certificate Errors is enabled, data is encrypted, but no certificate checking is performed. - Enter the
Host IP address. - Click
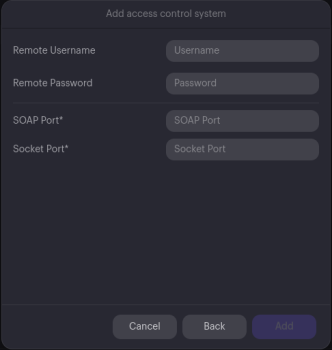
Next . - Configure the Nedap server settings:
- Enter the
Remote Username andRemote Password for the user account created for the Alta Video integration in Nedap AEOS. - Enter the
SOAP Port . - Enter the
Socket Port . - Click
Add .
Your Nedap access control server is added to Alta Video. - Click
Close .


