Configure SAML with Microsoft Entra ID
Last modified: Thursday October 23, 2025.
Configure Microsoft Entra ID as your SAML IdP for Alta Video.
For detailed information on configuring Microsoft Entra ID as your SAML IdP, see https://learn.microsoft.com/en-us/entra/identity/enterprise-apps/add-application-portal-setup-sso
Before you start
The configuration steps shown here are part of the process of configuring SAML SSO for Alta Video. To complete them, you will need:
- Your Alta Video Entity ID
- Your Alta Video ACS URL
To obtain them, see Configure Alta Video to enable SAML single sign-on.
Create an Alta Video cloud enterprise application
- Sign in to the Microsoft Entra admin center.
- Open Enterprise apps.
- Click + New application.
- Click + Create your own application.
- In the Name field, type a name for your Alta Video application.
- Click Create.
Create groups for your users
You can repeat these steps and create multiple Entra ID groups that correspond to your Alta Video user groups, such as administrators and operators.
- Open Groups.
- Click New group.
- Set Group type to Security.
- Enter a Group name, for example, Alta_Admins.
- Optional: Enter a description for the group.
- Set Membership type to Assigned.
- Click No owners selected. Select your user name and click Select.
- Click No members selected. Choose the required users.
- Click Create.
Add users to an existing group
You can add new users to existing groups after configuring you application.
- Open Groups > All groups.
- Select the required group.
- From Manage click Members.
- Click + Add members.
- Locate and select the required users and click Select.
Define app roles
You can repeat these steps and create multiple app roles that correspond to your Alta Video user roles, such as administrators and operators.
- Open App registrations.
- Select All applications.
- Locate and select your application.
- From Manage click App roles.
- Click + Create app role.
- Enter a display name, for example, Alta_Admins.
- For Allowed member types, select Users/Groups.
- In the Value field, enter the name of the relevant Alta Video user group, for example, Administrators.
The text in the Value field must exactly match the name of the Alta Video role.
- Enter a description of the role.
- Select Do you want to enable this app role?.
- Click Apply.
Assign users, groups, and roles to your enterprise application
Repeat the following steps to add your users and groups to your application and assign them the required roles.
- Open Enterprise apps and select your Alta Video application.
- From Manage click Users and groups.
- Click + Add user/group.
- In Users and groups, click None selected.
- Select the required groups or individuals.
- Click Select.
- In Select a role, click None selected.
- Select the required role for these groups or users.
- Click Select.
- Click Assign.
Basic SAML Configuration
- Open Enterprise apps and select your Alta Video application.
- From Manage click Single sign-on.
- Click SAML.
- In the Basic SAML Configuration panel, click
 Edit.
Edit.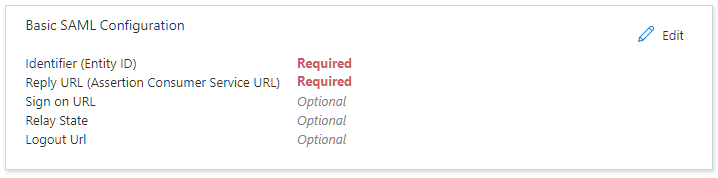
- For Identifier (Entity ID), enter the Entity ID obtained from Alta Video.
- For Reply URL (Assertion Consumer Service URL), enter the ACS URL obtained from Alta Video.
- Click Save.
Configure Attributes & Claims
- Open Enterprise apps and select your Alta Video application.
- From Manage click Single sign-on.
- Click SAML.
- In the Attributes & Claims panel, click
 Edit.
Edit.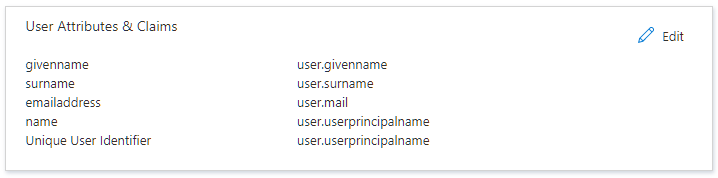
- Define the user information (attributes) that Entra ID will send in the SAML assertion to the service provider:
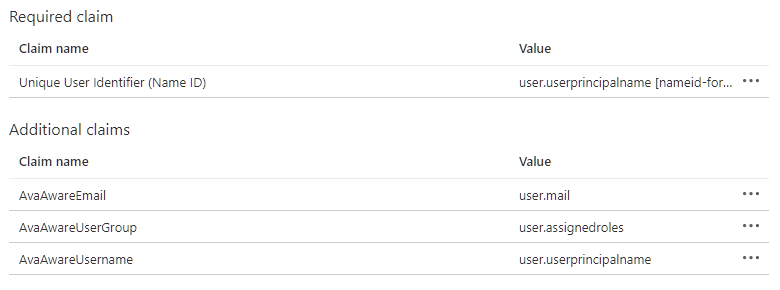
- To configure the email attribute:
- Click Add new claim.
- For Name, enter AvaAwareEmail.
- For Source attribute, select user.mail
Ensure that your Alta Video user profiles all include the address in the Contact info section.
- Click Save.
- To configure the username attribute:
- Click Add new claim.
- For Name, enter AvaAwareUsername.
- For Source attribute, select user.userprincipalname.
- Click Save.
- To configure the role attribute:
- Click Add new claim again.
- For Name, enter AvaAwareUserGroup.
- For Source attribute, select user.assignedroles.
- Click Save.
- In the Additional claims section, delete all other default claims, leaving only AvaAwareEmail, AvaAwareUserGroup, and AvaAwareUsername.
- Click Save.
Configure and obtain the SAML Signing Certificate
- Open Enterprise apps and select your Alta Video application.
- From Manage click Single sign-on.
- Click SAML.
- In the SAML Signing Certificate panel, click Edit.
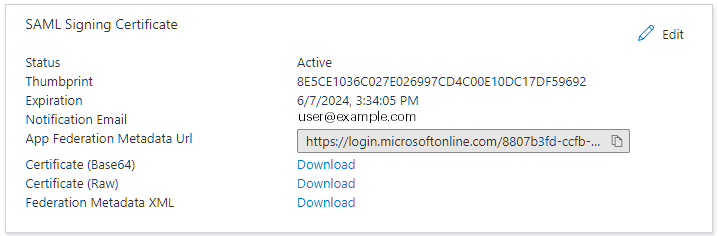
- For the Signing Option, select Sign SAML response and assertion.
- Click Save.
- In the SAML Signing Certificate panel, locate Federation Metadata XML and click Download. You need to upload this information to your Alta Video cloud deployment.
Return to Configure Alta Video to enable SAML single sign-on to complete SSO configuration for your deployment.